My First Ever Ostrich Egg Recipe : Ostrich Egg Fried Rice


How to cook an ostrich egg? Yes, that’s a big question when Nourished Communities gifted me an ostrich egg for my Foodtryb Mystery Ingredient Challenge. Didn’t expect to receive such a huge egg and need to create a recipe for this so I was struggling in the beginning as it seems a challenge to even figure out how to break the shell.


So if you followed my recent Instagram Stories and Reels, you should already meet Olly the Ostrich Egg. I had no idea what to cook until I spent a day with Olly to search for ideas, I finally got a recipe in mind and decided to do hard-boiling. (I usually like my egg soft-boiled but imagine the runny yolk from ostrich egg….NO, I CAN’T!) The concept is from Deviled Egg however I made a twist to serve fried rice into the hole of egg white with grated yolk.⁠


To hard boil an ostrich egg (1.5kg/42.5cm in circumference)

1. Put ostrich egg in a large pot, fill with cold water and ensure 1 inch above the egg.

2. Bring it to a rapid boil over high heat.

3. Once it comes to a boil, reduce to medium heat, cook for 2 hours and check/stir every 15 minutes to help the yolk centred.

4. When the time is up, carefully remove the egg from hot water, cool it down in icing bath or cold water. I let my ostrich egg completely cool about 1 hour. (The ostrich egg is extremely hot at this stage so BE CAREFUL to avoid a burn or an injury!)

5. Once the egg has cooled down, hold the egg in a stand (I use a double-sided tape to keep it steady), use screwdriver or the tips of scissors to crack a fissure in the shell, gradually pull it apart to release the content.


The shell of ostrich egg is probably 10 times thicker than a hen’s egg, so safe use of the tool when you break it.


To make this Ostrich Egg Fried Rice, you will need…

-Half hard-boiled ostrich egg.

-Finely diced carrots.

-1 bowl of cooked rice.

-Salt & pepper to season.

-Fried onions. (optional)

-Finely chopped chives.


Method

1. Take yolk out of the hard-boiled ostrich egg, roughly dice and place into a sieve.

2. Use backend of the spoon, press egg yolk through the sieve to get nice, finely grated yolk, then set aside.

3. Heat vegetable oil in a pan, stir in carrots until soften.

4. Add cooked rice, toss and stir until combined.

5. Season with salt and white pepper to taste.

6. Stir in chives and grated egg yolk, mix well.

7. Scoop fried rice back into the hole of ostrich egg white.

8. Top with fried onions, extra grated egg yolk, and chives.

9. Enjoy with your family!


Ostrich egg to me tastes not much different from hen's egg. The white part appears rubbery-looking but the texture is pretty similar like jelly or soft tofu , however egg yolk does offer an extra-rich and intense flavour due to its volume.


Here are two fun facts about ostrich egg I want to share with you…

1. Ostrich egg is the largest egg in the world and roughly equals to 24 hen’s eggs.

2.Ostrich egg is very strong so it can take the weight around 220kg vertically and 120kg horizontally.


How do you like that? You can also tell from the picture how big the ostrich egg is as I made another with normal sized egg to compare!


Click below to see my Reels about my ostrich egg, it's so fun to watch...

Olly the Ostrich Egg's Happy Life.

Say Goodbye to Olly


Save this ultimate ostrich egg recipe as you might need it one day!


Basque Burnt Cheesecake 巴斯克焦香乳酪起司蛋糕


Basque Burnt Cheesecake might be one of the leading food trends of pandemic since last year and I finally give it a go now. The method is just so simple that hardly can fail and it certainly brings some comfort and satisfaction when feeling a bit moody with London’s unsettled weather.


Ingredients

-200g soft cheese.

-2 eggs.

-60g sugar. (I used dark muscovado sugar here)

-20g plain flour.

-200ml cream.

-1 tbsp vanilla extra.

-Icing sugar and cocoa powder. (optional.)


Method

1. Preheat oven at 220°C.

2. First beat soft cheese and sugar in a large mixing bowl until smooth.

3. Beat in eggs, add cream, flour, and vanilla extra, one at a time and mix until fully combined.

4. Pour into the prepared tin. (I used a 19 cm tin and lined with baking paper.)

5. Bake for 20-25 minutes until dark and almost burnt on the top, if the cake is still runny in the centre, reduce the heat to 200°C and bake it for a longer time.

6. Leave to cool completely.

4. Dust with icing sugar and cocoa powder before serving.


The cake would sink in the middle but don’t let the looks fool you as that’s exactly what to be expected. I kept it in the fridge for the next day as I prefer to eat it in chill and it does taste so heavenly and creamy.


Have you ever tried Basque Burnt Cheesecake? Watch my Reels below to see how I made it!


Crispy Seaweed Crackers 自製海苔脆餅


Anyone knows ‘’のり天’’ (noriten) ? That is my favourite seaweed tempura snack that I can easily finish one pack in a few minutes. So when I first saw seaweed crackers food hack by simply using rice paper and nori seaweed sheets from Youtube, I told myself I have to try it! But since then I didn’t give it a go until recently I saw Edit.eats rice paper puffs which just reminded me again of this food experiment, and I finally made it yesterday !


The ingredients are quite simple and so easy to make. These seaweed crackers turned out super crispy that you just can’t stop snacking. I seasoned with salt only which already made it addictingly delicious. Highly recommend to try, this is a bit of fun as well.


Ingredients

-Rice paper sheets.

-Seaweed sheets.

-Oil to fry.

-Salt to season. (optional)


Method

1. Quickly dip rice paper into water.

2. Place rice paper on nori seaweed sheet, lightly press to stick them together.

3. Repeat and let dry.

4. Cut the sheets with kitchen scissors into pieces.

5. Heat oil in a saucepan over medium heat, stick the end of a wooden chopstick into oil, once you see many bubbles floating up, then the oil ready to fry.

6. Fry the seaweed rice paper pieces one by one (only takes 2-3 seconds to fry), drain on kitchen paper.

7. Season with salt and enjoy!


You can also click below to watch my Reels and see how I made these crispy seaweed snacks:


之前在Youtube看到這個炸越南米紙做的海苔脆餅就驚為天人,剛好櫥櫃裡還有剩半包去年夏天做越南春捲剩的米紙,可以拿來實驗一下。做法真的超簡單,炸出來的口感也非常酥脆,我覺得只單純灑鹽就已經很好吃了,家裡如果也有怎樣都用不完的米紙的話,可以跟海苔片一起炸一下,只要幾片就可以炸出一大盆美味點心。 

Taiwanese Rice Noodles Soup 台式米粉湯


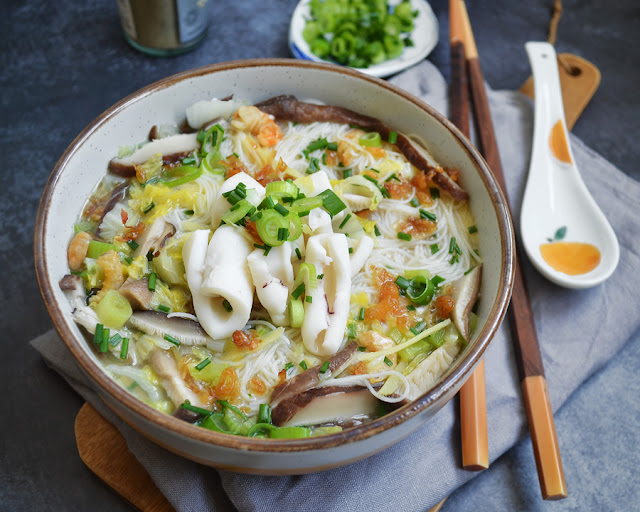
Probably not the best known, but Taiwanese Rice Noodles Soup (台式米粉湯) is another significant Taiwanese dish which is supper common in Taiwan from breakfast shops to local night markets. This is also a common home dish that every Taiwanese family would have their own recipe. Taiwanese rice noodles soup could be very simple with fewer ingredients, but today I would like to do a sumptuous version to make it full of umami and Taiwanese flavour. This is what I called a hearty nostalgic reminder of my Taiwanese home.


Ingredients

-2 raw squid tubes, cut into pieces.

-2-3 ginger slices, cut into matchstick-sized pieces.

-3-5 tbsp rice cooking wine.

Marinate squid and ginger in rice wine for 15 minutes.


Other ingredients

-2 packs of rice noodles, soaked in hot water for 5 minutes, drain and set aside.

-3-5 dried shiitake mushrooms, soaked in 1 cup water until soften, drain and cut into thin strips. Keep shiitake soaking water.

-2 tbsp dried shrimps, soaked in 1 cup water until soften, drain and keep shrimps soaking water.

-1 cup of water.

-1 celery stick, lightly peeled off the strings and finely chopped.

-3-4 pieces Chinese leaves, cut into strips.

-Finely chopped chives.

-Finely chopped spring onions.

-1 tbsp sea salt.

-1 tbsp fish sauce.

-1 tsp white pepper.

-Fried shallots or fried onions to garnish.


Method

1. Heat oil in a large stock pot over medium high heat, stir fry Chinese leaves, shiitake mushrooms, spring onions, dried shrimps, celery and chives until soften and fragrant.

2. Pour shiitake and shrimps soaking water and 1 cup of water, bring it to a boil and reduce the heat, simmer for 5 minutes, season with salt and fish sauce.

3. Add rice noodles, cook for 2-3 minutes.

4. Add squid, ginger and soaking rice wine, cook for a further 1-2 minutes.

5. Serve into noodle bowls, add white pepper and sprinkle with fried shallots.


本來想做小卷米粉,但最後又演變成料很多的豪華版本,雖然英國買得到米粉,但有時還是會很想念充滿家鄉味的粗米粉,有人也跟我一樣是喜歡吃粗米粉的嗎?


Gyudon / Japanese Beef Bowl 日式牛丼飯


Gyudon is a Japanese dish of thinly sliced beef cooked in sweet sauce mixture to serve over the rice. I’ve ordered Gyudon quite often when eating at Japanese restaurant as this was something I wouldn’t cook at home. The reason is I can’t get thinly sliced beef from supermarkets, don’t like the quality of frozen shabu meat from oriental stores, either. However since last year there’s a new Korean butcher shop opening at my area, I can finally get a nicer and fresher quality of thinly sliced beef and am able to make myself Gyudon at home! Adapted from MASAの料理ABC recipe, here is how I made it:


Ingredients

-100g beef belly shabu slices, marinated with honey and ginger mince for 15 minutes.

-1/2 onion, sliced.

-150ml water.

-50ml mirin.

-1 tbsp sake.

-Chopped spring onions and sesame seeds to garnish.


For the Sauce Mixture

-1 tsp sugar.

-1 tbsp soy sauce.

-A pinch of salt.

-A pinch of garlic powder. (optional)


Method

1. Heat oil in a pan over medium heat, stir fry onions until tender.

2. Add water, mirin, and sake mixture in, bring it to a boil.

3. Add marinated beef and cook until the meat is no longer pink.

4. Add sauce mixture, reduce to low heat and simmer for 3-5 minutes.

5. Serve over the rice, top with an egg of your choice (I did poached egg) and sprinkle with spring onions and sesame seeds.


I think I missed to put on pink sushi ginger (a must to pair with Gyudon) but this was still so yum!


You can also click below to watch my Reels and see how I made this Gyudon:


突然有點想念吉野家的牛丼飯,還有每次去Eat Tokyo會點的牛丼便當,而且原來自己煮一點不難,重點是要有薄切的牛肉片啊!


Easy Quiche Recipe with Sardines & Olives 沙丁魚橄欖鹹派


A quiche for weekend brunch? YES!


Just saw this easy quiche recipe from Utosh and I had almost forgotten how much I loved this savoury pie! I think quiche is a dish that I first tried to make when I was a beginner cook, it’s so easy to put everything together, just simply use ready rolled pastry sheet to save your time and add the ingredients you like. Quiche can be served hot or cold, but freshly baked one is always the best!

𝐈𝐧𝐠𝐫𝐞𝐝𝐢𝐞𝐧𝐭𝐬⁠

-1 puff pastry sheet (about 200g).⁠

-5 brisling sardines.⁠

-5 olives from The Real Olive Company

-50g sweetcorn.⁠

-1 tbsp edamame beans or garden peas.⁠

𝐅𝐨𝐫 𝐭𝐡𝐞 𝐦𝐢𝐱𝐭𝐮𝐫𝐞⁠

-2 eggs⁠

-100ml milk⁠

-A pinch of black pepper.⁠

-A handful of grated cheddar.⁠

Method

1. Preheat the oven to 200°C.

2. Unroll the pastry sheet and place on a 18cm baking tin or oven safe pie dish, chill for a while and then cut off the edges of pastry.

3. Spread sweetcorn, edamame beans, and garden peas on the pastry, pour over the egg mixture.

4. Bake for 12-15 minutes, add brisling sardines, olives, and additional grated cheeses on top, keep baking in oven for a further 12-15 minutes.

Also want to share two quiche fun facts you might or might not know…⁠

1️⃣Quiche is regarded as a French classic but it actually originated in Germany.⁠

2️⃣Quiche is from the German ‘kuchen’ which means cake.⁠

(Are you surprised about these facts?)⁠

Then what are your favourite quiche fillings?⁠